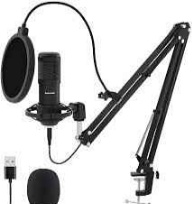
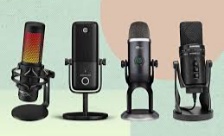
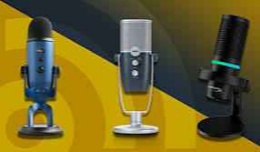
When it comes to setting up a streaming microphone, there are a few key components to keep in mind for optimal audio quality. First and foremost, choosing the right microphone is crucial. Look for a high-quality condenser microphone that is compatible with your computer or streaming device. Additionally, investing in a shock mount and pop filter can help reduce unwanted noise and improve the overall sound clarity. Positioning the microphone correctly is also important - aim to have it a few inches away from your mouth and at a slight angle to avoid plosives. Finally, adjusting the microphone's gain settings and testing different levels before going live can ensure that your audience hears you loud and clear. By following these tips, you can create a professional and polished audio setup for your streaming sessions.
Mastering the Microphone: A Comprehensive Guide to Streaming Microphone Setup
The microphone is the lifeblood of your Twitch stream, the conduit for your voice, humor, and connection with your audience. But a top-of-the-line microphone alone won't guarantee crystal-clear audio. A well-optimized microphone setup is key to ensuring your voice cuts through the noise and resonates with your viewers. This comprehensive guide delves deep into the world of streaming microphone setups, empowering you to craft a solution that elevates your audio quality and stream professionalism.
Understanding Your Streaming Ecosystem:
Before diving into specific gear and configurations, it's crucial to assess your current streaming setup. Consider the following:
Microphone Choice: Have you already chosen a microphone, or are you still shopping around? Different microphones have different requirements and may influence your setup complexity.
PC or Console Streaming: Are you streaming directly from your PC or utilizing a capture card to stream console gameplay? This could impact the available audio routing options.
Budget: How much are you comfortable spending on additional equipment and software for your microphone setup?
Technical Expertise: How comfortable are you with audio settings and software configuration?
Planning Your Setup: Essential Components
Now that you have a clear picture of your streaming environment, let's explore the essential components for a solid microphone setup:
Microphone Stand (Boom Arm): A microphone stand, ideally in the form of a boom arm, allows you to position the microphone precisely for optimal audio capture. Look for a boom arm that offers adjustable positioning and sturdy construction to avoid unwanted vibrations.
Pop Filter: This essential accessory minimizes those annoying "p" and "b" sounds (plosives) that can ruin your audio quality. Many microphones come bundled with a pop filter, but you can also purchase them separately.
Shock Mount (Optional): If your microphone stand is prone to vibrations (e.g., from your desk), a shock mount can help isolate the microphone and minimize unwanted background noise. This is especially important for condenser microphones, which are more sensitive to vibrations.
Audio Cables: Choose the appropriate cables based on your microphone connectivity. USB microphones require standard USB cables, while XLR microphones necessitate XLR cables to connect to an audio interface.
Connecting Your Microphone: USB vs. XLR
The choice of microphone type (USB vs. XLR) plays a crucial role in your setup:
USB Microphones: These offer plug-and-play simplicity. Connect the microphone directly to your PC's USB port, and your system should automatically recognize it. USB microphones are ideal for beginners and those seeking a straightforward setup.
XLR Microphones: These require an additional piece of equipment: an audio interface. This device acts as a bridge between your XLR microphone and your PC, converting the analog audio signal from the microphone into a digital format your computer can understand. Audio interfaces often offer additional features like phantom power (needed for some condenser microphones) and more granular control over your audio. While offering superior audio quality and flexibility, XLR setups involve a steeper learning curve and additional cost compared to USB microphones.
Software Configuration: Fine-Tuning Your Audio
Once your hardware is connected, it's time to configure your streaming software's audio settings:
Microphone Selection: Ensure your chosen microphone is selected as the default audio input device in your streaming software like OBS Studio or Streamlabs OBS.
Input Gain: This controls how loud your microphone picks up your voice. Increase the gain if your voice is too quiet, but be wary of clipping (distortion) on loud peaks.
Noise Gate: This can be a lifesaver if you have background noise. Set the noise gate threshold low enough to pick up your voice but high enough to cut out unwanted background hiss or hum.
Equalization (EQ): EQ allows you to fine-tune the frequency response of your microphone. Boost specific frequencies, like highs, for a brighter sound or lows for a richer tone. Start with subtle adjustments and experiment to find the sweet spot.
Compression (Optional): While not always necessary, compression can help even out the volume of your voice. Be cautious when using compression, as too much can make your voice sound unnatural.
Additional Considerations: Advanced Techniques and Troubleshooting
For those seeking even higher audio quality or facing specific challenges, here are some advanced microphone setup techniques and troubleshooting tips:
Acoustic Treatment: Consider treating your streaming space with acoustic panels or soundproofing materials to absorb unwanted sound reflections and minimize background noise.
Dual Microphone Setup (Advanced): For a more professional sound, some streamers utilize a dual microphone setup, often combining a dynamic microphone for background noise reduction and a condenser microphone for capturing the clarity and detail of your voice. However, this approach requires a more complex setup with an audio interface capable of handling multiple inputs.
Monitoring Your Audio: Use headphones with good audio quality to monitor your microphone input. This allows you to hear your voice in real-time, ensuring you're speaking at an appropriate volume and can adjust settings on the fly.
Software Mixing and Routing: Advanced streaming software like OBS Studio offers powerful mixing and routing options. You can utilize these features to create separate audio channels for your microphone, game audio, and other sources, allowing for more granular control over your final audio mix.
Troubleshooting Common Audio Issues:
Some common audio issues streamers face and how to address them:
Low Microphone Volume: Check your microphone's gain settings and ensure your microphone is properly selected in your software. You might also need to adjust microphone boost settings in your operating system's sound settings.
Background Noise: Utilize a noise gate in your streaming software, and consider treating your streaming space with acoustic panels for better sound absorption.
Audio Clipping: Reduce your microphone gain or adjust volume levels in your software to prevent audio clipping (distortion).
Voice Distortion: Ensure your microphone is positioned optimally and experiment with different EQ settings in your software. Issues with your audio interface or microphone itself could also be the culprit.
The Art of Experimentation: Refining Your Setup
The best microphone setup is the one that works for you and your specific streaming environment. Don't be afraid to experiment with different configurations, microphone placement, and software settings. Record yourself speaking and listen back to your audio to identify areas for improvement. Utilize online resources, tutorials, and communities dedicated to streaming to learn from other creators and refine your setup.
Conclusion: Mastering the Art of Microphone Magic
A well-optimized microphone setup is an investment in the quality of your stream. By understanding your needs, selecting the right equipment, and utilizing proper configuration techniques, you can ensure your voice shines through and captivates your audience. Remember, the journey towards mastering your microphone setup is an ongoing one. As you gain experience and experiment, you'll discover the perfect configuration that elevates your audio quality and propels your stream to new heights.
Bonus Section: Streamlining Your Workflow
Beyond technical considerations, here are some additional tips to streamline your microphone workflow and enhance your streaming experience:
Create Voice Presets: Many streaming software options allow you to save your preferred audio settings as presets. This allows you to quickly apply the perfect configuration for different scenarios, saving valuable time during setup.
Hotkeys for Mute/Unmute: Consider assigning hotkeys on your keyboard or streaming device to quickly mute or unmute your microphone. This can be helpful for coughing, taking breaks, or responding to off-stream events without interrupting your stream flow.
Read Also: The Ultimate Guide to Finding the Best Microphone for Twitch Streaming
Invest in a Noise-Cancelling Headset: A good noise-cancelling headset can be a valuable addition to your streaming setup. It can isolate background noise while you're not actively speaking and allows for clear communication with your teammates or chat moderators.
By following these comprehensive guidelines and embracing a spirit of constant learning, you can unlock the world of exceptional audio and transform your microphone into a powerful tool that fuels audience engagement and elevates your streaming experience to the next level. So, go forth, experiment, and let your voice be heard!


