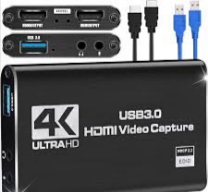
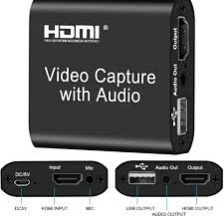
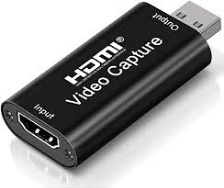
A video capture card is a hardware device that allows users to capture and record video footage from an external source, such as a video camera or gaming console, onto their computer. This technology has become essential for content creators, gamers, and anyone looking to create high-quality videos or livestreams. Video capture cards come in various forms, including internal cards that are installed directly into a computer's motherboard, and external cards that connect via USB or Thunderbolt. These devices typically offer features such
Capturing Your Glory: A Comprehensive Guide to Video Capture Cards
Transform your gameplay into captivating content with the power of a video capture card. This comprehensive guide delves into the world of capture cards, equipping you to choose the perfect option for your streaming or recording needs. From understanding the basics to exploring advanced features, you'll be ready to capture, edit, and share your gaming moments with the world.
Unveiling the Capture Card: A Gateway to Content Creation
A video capture card acts as a bridge between your gaming console or PC and your computer. It captures the raw video and audio signal from your gameplay and allows you to record it on your computer for editing and sharing purposes.
Beyond Gameplay: While primarily used for capturing gameplay, video capture cards offer a wider range of functionalities:
Livestreaming: Broadcast your gameplay sessions live on platforms like Twitch or YouTube, engaging with your audience in real-time.
Recording Educational Content: Create tutorials, walkthroughs, or highlight reels to share your gaming knowledge with others.
Capturing Creative Projects: Use your capture card to record footage from other sources like creative software or even a second PC for advanced content creation.
Demystifying the Jargon: Essential Capture Card Terminology
Before diving into the selection process, let's break down some key capture card terminology:
Internal vs. External Capture Cards: Internal capture cards install directly into your computer's PCIe slot, offering higher performance but requiring technical know-how for installation. External capture cards connect to your computer via USB, offering portability and ease of use.
Passthrough: This feature allows the captured video signal to be displayed on your monitor simultaneously while being recorded on your computer.
Latency: Refers to the delay between the action happening on your screen and what's captured by the capture card. Lower latency is crucial for smooth gameplay during passthrough.
Resolution and Frame Rate: Capture cards can handle different resolutions (e.g., 1080p, 4K) and frame rates (e.g., 60 FPS, 120 FPS). Choose options that support the output capabilities of your gaming console or PC.
Software Compatibility: Ensure the capture card you choose is compatible with your desired recording software, such as OBS Studio, XSplit, or the software provided by the capture card manufacturer.
Choosing Your Champion: Selecting the Right Video Capture Card
With a vast array of capture cards available, navigating the selection process can be overwhelming. Let's explore the key factors to consider when making your choice:
Compatibility: Ensure the capture card is compatible with your gaming console (e.g., PS5, Xbox Series X), PC operating system (Windows, Mac), and desired recording software.
Performance: Consider the highest resolution and frame rate you want to capture at. Choose a capture card that supports these specifications without introducing lag or dropped frames.
Features: Do you need passthrough for live monitoring while recording? Are hardware encoding capabilities for smoother recording crucial for your needs? Prioritize features that enhance your workflow.
Form Factor: Do you have space for an internal capture card, or do you prefer the portability of an external option?
Budget: Capture cards range in price depending on their features and performance capabilities. Set a realistic budget and choose an option that offers the best value for your needs.
Pro Tip: Research online reviews and user experiences with specific capture cards to gain real-world insights before making a purchase.
The Art of the Capture: Setting Up and Using Your Video Capture Card
The setup process for your capture card will vary depending on whether you choose an internal or external option. Here's a general overview:
Internal Capture Card:
Power down your computer and open the case.
Install the capture card into a free PCIe slot and secure it.
Close the case and power on your computer.
Install the drivers provided by the capture card manufacturer.
Configure your recording software to recognize the capture card as the video and audio source.
External Capture Card:
Connect the capture card to your gaming console or PC using the appropriate HDMI or DisplayPort cable.
Connect the capture card to your computer's USB port using a high-quality cable.
Install the drivers provided by the capture card manufacturer.
Configure your recording software to recognize the capture card as the video and audio source.
Beyond the Basics: Optimizing Your Capture Card for Streamlining
Once you have your capture card up and running, explore these tips for an optimized workflow:
Streamlining Recording Settings: Most capture cards and recording software offer various encoding options. Experiment to find a balance between video quality, file size, and system performance. Consider utilizing hardware encoding capabilities on your capture card, if available, to offload processing from your CPU.
Hotkey Customization: Utilize hotkeys within your recording software for functions like starting/stopping recording, taking screenshots, or muting audio. This allows for seamless control during gameplay.
Overlay Customization: If you plan on streaming, personalize your stream with overlays that showcase your logo, social media links, or even a live chat window.
Staying Organized: Develop a system for organizing your captured footage with clear naming conventions and folder structures. This will save you time searching for specific clips during editing.
The Editor's Arsenal: Software Options for Post-Production Magic
Once you've captured your gameplay footage, explore these popular recording software options for editing and polishing your content:
Open Broadcaster Software (OBS Studio): This free, open-source software is a powerhouse for both recording and streaming. It offers a wide range of customization options and powerful features.
XSplit: A more user-friendly option compared to OBS Studio, XSplit offers a paid subscription model with intuitive editing tools and live production features.
DaVinci Resolve: While primarily a professional-grade video editor, DaVinci Resolve offers a free version with surprisingly powerful editing capabilities, making it a great option for aspiring content creators.
Adobe Premiere Pro: The industry standard for video editing, Adobe Premiere Pro offers a robust set of tools for advanced editing and color correction. However, it requires a paid subscription.
Pro Tip: Choose recording software based on your budget and editing needs. Start with a free option like OBS Studio or explore free trials of paid software before committing to a subscription.
Sharing Your Masterpiece: Platforms for Showcasing Your Gameplay Content
With your edited video ready, choose the platform to share your gaming prowess with the world:
Twitch: The king of live streaming, Twitch is a platform dedicated to live gameplay broadcasts. Interact with viewers in real-time, build a community, and showcase your gaming skills.
YouTube: Upload your edited videos to YouTube and create a channel dedicated to your gameplay content. Utilize tags, descriptions, and engaging thumbnails to attract viewers and grow your audience.
Social Media: Share clips of your most impressive plays on platforms like Twitter, Facebook, or Instagram. This is a fantastic way to build anticipation for your longer-form content on YouTube or Twitch.
Level Up Your Game: Advanced Capture Card Techniques for Pros
Once you've mastered the basics, explore these advanced capture card techniques to elevate your content creation:
Multi-Input Capture: Capture footage from multiple sources simultaneously. Use your capture card for gameplay while recording your webcam overlay or voice commentary from a separate microphone.
Chroma Keying: This technique allows you to remove a green or blue background from your webcam footage and replace it with another image or video, providing a more professional look for your streams.
Advanced Audio Mixing: Utilize software tools to control audio levels from different sources, ensuring clear and balanced audio for your viewers.
The Final Boss: Maintaining Your Video Capture Card and Setup
With proper care, you can ensure your capture card and setup continue to deliver optimal performance:
Software Updates: Keep your capture card drivers and recording software up-to-date to benefit from bug fixes and performance improvements.
Hardware Maintenance: Regularly clean your capture card's external ports free of dust accumulation for optimal connection stability.
Cable Management: Organize your cables neatly to prevent them from getting tangled or pulling on your capture card.
Read Also: Unlock New Gaming Horizons: The Enhanced Sensation of PS5 Controller Grips
Heat Management: Ensure adequate airflow around your computer and capture card to prevent overheating, especially when utilizing hardware encoding features.
Conclusion: Capture Your Glory and Share Your Passion
A video capture card empowers you to capture your gaming moments, transform them into captivating content, and share your passion with the world. With the knowledge gained from this guide, you're well-equipped to choose the perfect capture card for your needs and embark on your journey as a content creator. So, unleash your creativity, capture your gameplay glory, and share it with the world!


